Jessica's Favorite Biscuits (Bubble-Biscuits)
Skip
to:  Printer
Friendly Version (omits tips and pictures)
Printer
Friendly Version (omits tips and pictures)
Biscuits were one of the first things I learned to cook, taken from a basic recipe in my mom's fading Betty Crocker Cookbook. Of course, I've been through many iterations of tweaking this recipe to make the perfect bubble-biscuit. How does a bubble-biscuit vary from a regular biscuit? Tall and fluffy, cracking in the middle, having a more round shape than a flat cookie-like shape.
When I was staying with a family in Australia (where "bicuit" means cookie or cracker) I made this American version of biscuits. They compared the taste to a scone, although to an american, a scone is a bit more sugary and more crisp.
Serving suggestion: use this as a side dish for turkey stew, or as a side dish to complement chicken and veggies.
Ingredients:
Small recipie makes about 8 (2" biscuits)
Big recipie makes about 12 (2" Biscuits)
| Small Recipie | Big Recipie | Ingredient |
| 2 cups | 3 cups | all-purpose flour |
| 3 heaping teaspoons | 2 level tablespoons | baking powder |
| 1 teaspoon | 1 ½ teaspoons | salt |
| 1/4 cup | 3/8 cup | butter |
| 3/4 cup | 1 cup | warm water |
Tools:
- Large Mixing bowl (and/or food processor)
- 1 cup glass measuring cup
- teaspoon
- 2" Round cookie cutter
- Cutting board, Rolling Pin
- Baking sheets
- Oven
Directions:
1. Pre-heat oven to 450° (pre-heating and cooking at 450 rather than 425 is important for keeping the biscuits from needing too cook too long. Cooking the biscuits too long will make the bottoms stiff and overly crunchy).
2. Mix flour, baking powder, and salt in large mixing bowl (or mix on pulse setting in food processor).
Quantity Tip: Be generous with the quantity of baking powder, the large recipe has been adjusted for level tablespoons. But if following the small recipe, using heaping teaspoons rather than level teaspoons for the baking powder. If you don't add enough baking powder they won't have a light fluffy texture, but if you add too much they will be "grainy" tasting.
Food Processor: I like doing it by hand, but either way works fine. The food processor makes mixing the dough quicker and easier, but makes for more cleanup work. The large-sized recipe is sized for what will fit in a standard size food processor. Use the standard sharp metal mixing/chopping blade, and be cautious not to cut yourself!
3. Soften butter. The butter needs to be soft (but not melted). If you plan ahead, you can leave out the butter several hours and it may be nice and soft already. If the temperature of the room is on the cool side or you are in a hurry, soften the butter in the microwave or on the stove. Remember: goal is to soften, not melt the butter. Slightly melted is fine, but try not to melt more than necessary.
Microwave instructions: Place in microwave safe container (the glass or plastic measuring cup needed to measure the water in a later step is a convenient choice) and cook on high for 5-7 seconds, then test softness with knife. Repeat if necessary. On a powerful microwave, a lower temperature setting for a longer period of time may give better results. In the microwave the inside of butter will soften faster than the exterior!
Gas-stove instructions: Place glass (not plastic) measuring cup on top of cookie sheet over heat element. Heat on lowest temperature setting until somewhat softened.
Softening butter on a gas stove
3. Cut in shortening until the mixture looks like meal. By hand, cut in with a fork. If using a food-processor, mix in using pulse setting (use a butter knife to scrape the dough off the sides of the mixing bowl a couple times).
 Not Meal-like (notice the butter clump I'm holding) |
|
4. Slowly add warm water to the mixture. You may need slightly more or less water than the recipe calls for, so don't add it all at once. If you add too much water the dough will get sticky (add a little extra flour to reduce the stickiness if necessary). If the dough is still crumbly after mixing, continue adding water and mixing until the dough can be kneeded into a ball (do not kneed more than necessary as the dough will get stiff) without leaving leftover crumbs behind.
 The dough will begin to clump together as water is added. |
 Continue adding water until the crumbs in the bottom of the bowl stick to the dough lump. |
Food processor tip: Pour the water in through the pour top while bowl spinning on constant on mode. Occasionally stop and pulse bowl or scrape sides with butter knife. Dough is done when it rolls into a big lump that thuds around the machine awkwardly.
5. Dust cutting board and rolling pin with flour. (This prevents the dough from sticking, if the dough gets sticky, re-dust as needed).
6. Roll dough into 1/2 to 3/4 inch thickness. Kneed dough into ball (don't kneed more than you have to, dough will get stiff) and using rolling pin to flatten. Roll the rolling pin in both directions to flatten more evenly. To make flatter biscuits use 1/2" thickness. For more bubbly biscuits, use 3/4" thickness. For splitting at the seams bubbly biscuits, roll dough to half the desired thickness, sprinkle lightly with flour, and then fold in half; roll slightly to remove excess air-bubbles.
7. Cut biscuits from dough with 2" round cookie cutter. Don't have a round cookie cutter? You could try another simple shaped cookie cutter of a similar size (avoid the gingerbread man shaped cutters, stick to rounded shapes), or use an upside down small drinking glass. But you really should get a 2" round cookie cutter, not only is it easier to work with, but the taste of the finished product is better if you use a sharp cutting tool. I've expirmented with different shapes and sizes, 2" round is definitely best tasting.
Two-inch circle cutter, plus similar sized heart
cutter that might do in a pinch
This dough is a bit over-kneeded, it looks lumpy
even after rolling.
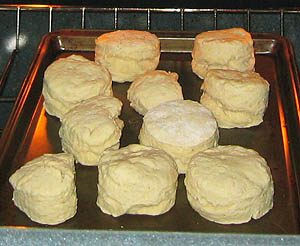
8. Place biscuits on an ungreased baking sheet. You don't have to leave a lot of space between biscuits, they won't expand much horizontally, just make sure they aren't touching (unless you really want siamese biscuits).
9. Cook 7 to 9 minutes or until just barely golden brown. If you aren't sure if they are cooked all the way, take one of the taller biscuits and slice in half, the middle should not be doughy. If they're getting browned before they are cooked through the middle, either roll the dough thinner or use a different oven temperature.
10. Remove biscuits from the cookie sheet ASAP after removing from the oven (don't burn yourself: use a spatula not your fingers to do this). If you let the biscuits cool on the cookie sheet the bottoms will become thick and crispy and not taste as good. Moving them to a plate that's not hot will help a bit.
Serve warm. Break in half, and top with butter and jam (boysenberry is my favorite, but use whatever is your favorite flavor).
Leftover Potential: Biscuits if stored in the fridge in air-tight container have a long shelf life. I store in a gallon sized "freezer" Ziplock bag. Reheat by microwaving; for a single biscuit, cook 15-30 seconds. Or place on the side of a plate of food. They taste good reheated, but are even better fresh out of the oven.